
Automating and deploying workflows with GitHub Actions
Our application successfully builds and passes our test, and our deployment environment is ready. We have just one job left to do in our workflow: deploying our Next.js application to GitHub Pages with GitHub Actions!
In this guide, you will learn:
How to set permissions for specific use-cases
How to choose a deployment environment in a workflow
How to deploy a Next.js static site to GitHub Pages with GitHub Actions
Add a deploy job to run after a successful test
With GitHub Pages enabled and our environment created and configured, we’re finally ready to build our deploy job.
Open the Code tab of your actions-learning-pathway repository, navigate to the .github/workflows directory and open the build-test-deploy.yml workflow file. It should look like this to start:
name: build-test-deploy
on: push
jobs:
  build:
    runs-on: ubuntu-latest
    steps:
      - name: checkout repo
        uses: actions/checkout@v3
      - name: use node.js
        uses: actions/setup-node@v3
        with:
          node-version: '18.x'
      - run: npm install
      - run: npm run build
  test:
    needs: build
    runs-on: ubuntu-latest
    steps:
      - name: checkout repo
        uses: actions/checkout@v3
      - name: use node.js
        uses: actions/setup-node@v3
        with:
          node-version: '18.x'
      - run: npm install
      - run: npm test
Similar to how we don’t want to run tests on a failed build, we don’t want to deploy a build that has failed our tests, so our first task is to check if our test job completed successfully. We’ll do that by again using the needs keyword after defining the deploy job:
deploy:
    needs: test
Define permissions
In Actions, the permissions keyword controls what tasks or processes our workflow can perform. Setting the right permissions ensures that our workflow can interact with various parts of our GitHub repository without any issues.
For our specific task, we're adjusting permissions for the GitHub token. This token acts like a key, allowing our workflow to access and modify parts of our repository. Since we're deploying to Pages, it's essential that our token has the necessary “write” access.
    permissions:
      contents: write
      pages: write
      id-token: write
Choose your deployment environment
In the last guide, we created a production environment. Now that it’s time to deploy our application, we need to identify that environment as the deployment target. We pass two parameters to environment: the name of the environment we want to deploy to and the url of our deployment. For url, steps.deployment.outputs.page_url grabs the deployed page URL from the final deployment step. We’ll show you how we identified this step for reference in just a moment when we get there.
While we’re at it, we again specify a GitHub-hosted runner with ubuntu-latest.
    environment:
      name: production
      url: ${{ steps.deployment.outputs.page_url }}

  runs-on: ubuntu-latest
Check out the repository with authentication
Just as with our other build and test jobs, our first step uses the checkout action to fetch our repository content. This time, however, we are planning to write, not just read, so we want to be sure to authenticate with GitHub to gain those permissions. The token: ${{ secrets.GITHUB_TOKEN }} is the default authentication provided by Actions. Combined with the permissions we just previously declared, it ensures that our workflow has the necessary permissions.
    steps:
      - name: checkout repo
        uses: actions/checkout@v3
        with:
          token: ${{ secrets.GITHUB_TOKEN }}
Set up Node and build the application for deployment
Use the setup-node action to set up the node environment again for the deploy job. Remember, every job runs independently, so you need to repeat these steps for each job:
      - name: use node.js
        uses: actions/setup-node@v3
        with:
          node-version: '18.x'
Configure Pages for deployment
Before we build our application, the configure-pages action configures our project for Pages deployment. We specify static_site_generator: next to alert the action that we're working with a Next.js static site.
      - name: configure github pages
        uses: actions/configure-pages@v3
        with:
          static_site_generator: next
Next, npm install fetches and installs all the project dependencies as defined in package.json, which primes our environment with all the necessary libraries and packages. Following that, npm run build triggers the build script within package.json, culminating in a compiled version of the application that’s ready for deployment. In the context of a Next.js app, this produces a ./out directory that lives in the runner while the job is active and contains the built static site.
      - run: npm install
      - run: npm run build
Upload artifacts to Pages
In the CI/CD context, an “artifact” is a package or set of files, resulting from a build process, that are meant for distribution or deployment. In this step, the upload-pages-artifact action packages the static site that Next.js built during the npm run build step. We do this by specifying path: ‘./out’. The upload-pages-artifact action then uploads the artifact to Pages.
      - name: upload artifacts
        uses: actions/upload-pages-artifact@v1
        with:
          path: "./out"
Deploy to Pages
In this final step, the deploy-pages action takes our prepared artifacts, which we built and uploaded in the previous steps, and deploys them directly to Pages.
By giving this step an id: deployment, we've labeled it, which provides us with a unique identifier. This is useful if we need to reference this particular step in subsequent tasks or to check on its status in more intricate workflows. If you look back a few steps to when we set the environment, you’ll see that we used this identifier to grab the URL for our site with url: ${{ steps.deployment.outputs.page_url }}.
Once this step completes successfully, your Next.js static content will be live and accessible on Pages.
      - name: deploy
        id: deployment
        uses: actions/deploy-pages@v1
Putting it all together, the deploy job should now look like this:
  deploy:
    needs: test

    permissions:
      contents: write
      pages: write
      id-token: write

    environment:
      name: production
      url: ${{ steps.deployment.outputs.page_url }}

    runs-on: ubuntu-latest

    steps:
      - name: checkout repo
        uses: actions/checkout@v3
        with:
          token: ${{ secrets.GITHUB_TOKEN }}

      - name: use node.js
        uses: actions/setup-node@v3
        with:
          node-version: '18.x'

      - name: configure github pages
        uses: actions/configure-pages@v3
        with:
          static_site_generator: next

      - run: npm install
      - run: npm run build

      - name: upload artifacts
        uses: actions/upload-pages-artifact@v1
        with:
          path: "./out"

      - name: deploy
        id: deployment
        uses: actions/deploy-pages@v1
With that, you’re ready to finally deploy your site to GitHub Pages!
Click Commit changes….
Enter a commit message and click Commit changes in the dialog box.
Select the “Actions” tab.
Click the commit message you just entered—or Update build-test-deploy.yml if you left it blank—to see the details of the workflow run.
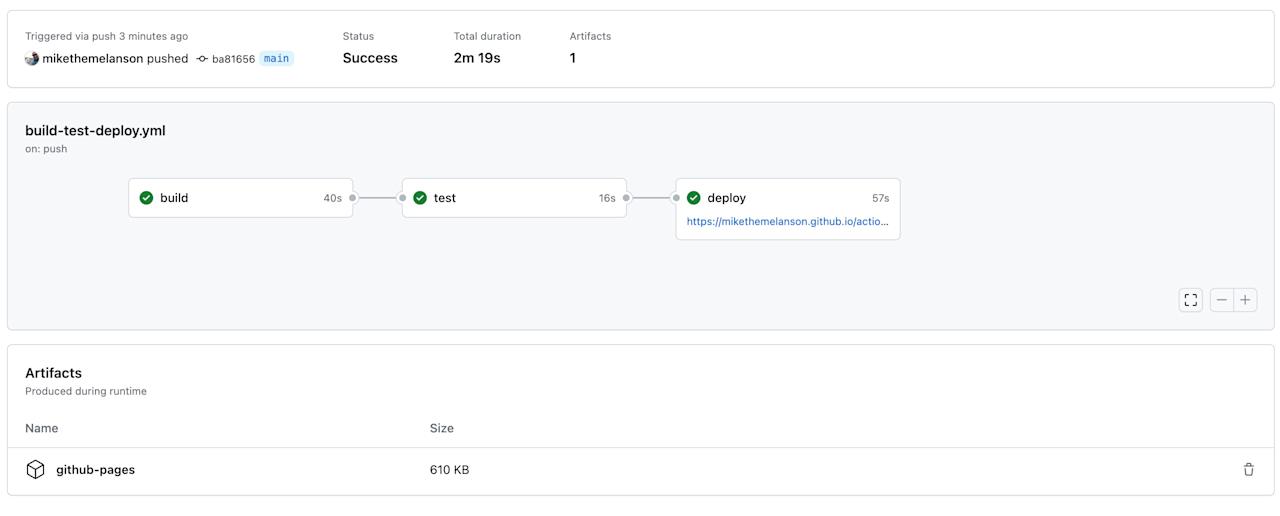
Chances are, you’ll get to the page quickly and find that the workflows are still in progress. Once all three workflows show as completed, you can view a variety of information about your deployment, such as the total duration to execute the workflow, or the number of artifacts created and their size. You can also download the artifact created during the build step by clicking on its name—github-pages.
Most importantly, your deploy job is followed by a link to your live GitHub Pages site that you just deployed. Click the link to see your site live!
Congrats, you've successfully set up an automated workflow with GitHub Actions to deploy your Next.js application to Pages.
Up next: Essentials automation module wrap-up
Now that we’ve covered the basics of writing workflow files and creating a simple CI/CD pipeline, it’s time to explore workflow automation at scale. In our next module, you’ll learn how to manage larger projects effectively while keeping your codebase clean and your team efficient. Before we move on, though, let's recap what we've done so far and round up some useful resources.