
Advanced CodeQL setup
When you enable CodeQL, you have the option to select either the "Default" or "Advanced" setup. Although we recommend using the Default setup whenever possible, there are use cases in which you will need to use advanced setup. Most commonly, you might need to specify a custom build process, add or remove queries, or exclude directories from a scan. Here's why KPMG decided to use the Advanced Setup:
In addition to needing external dependencies for our builds, we enabled advanced setup at KPMG because we saw the benefit of using CodeQL not just for security, but for code quality as well. Pull request reviews are great, but can only get you so far. We use several automated linting and code quality tools, but we've found that no tool catches everything. GitHub's security-and-quality query pack helps us catch things we wouldn't catch otherwise. We’ve also written a few custom queries to promote our own standards and style by alerting developers when they commit code, instead of asking them to make changes at some arbitrary time in the future. We've seen a big improvement in code quality already.
GitHub will try to automatically build applications as part of a CodeQL scan, but the autobuilder action won’t always be able to successfully build every application. Web Goat, for instance, requires a custom build to call Maven.
We'll start by adding custom build instructions for Web Goat in this guide, and move on to changing our CodeQL queries and excluding directories in the next step.
In this guide, you will learn:
When to use CodeQL advanced setup instead of the default setup
How to edit a CodeQL configuration file
How to set custom build instructions for CodeQL
1. Add custom build instructions to CodeQL with advanced setup.
CodeQL is typically run and managed through GitHub Actions using the CodeQL action. Just as you would with any other action, CodeQL advanced setup is called and managed with a workflow file written in YAML. When you use the Default configuration, this YAML file is hidden from you and managed behind the scenes. For an advanced setup, we will need to create our own workflow file.
Fork the Web Goat repository into an organization with GHAS enabled if you haven’t already. If you haven’t already enabled GitHub Actions for the repository, click Settings under your repository name. If you cannot see the Actions tab, select the “...” dropdown menu, then click Actions. Click the button that says I understand my workflows, go ahead and enable them.
Go to your Web Goat repository's Settings tab.
On the sidebar, under Settings, select Code security and analysis.
If you haven't enabled CodeQL previously, find the Code scanning heading and select the Set up drop down. You'll see a choice between Default or Advanced. Select Advanced.
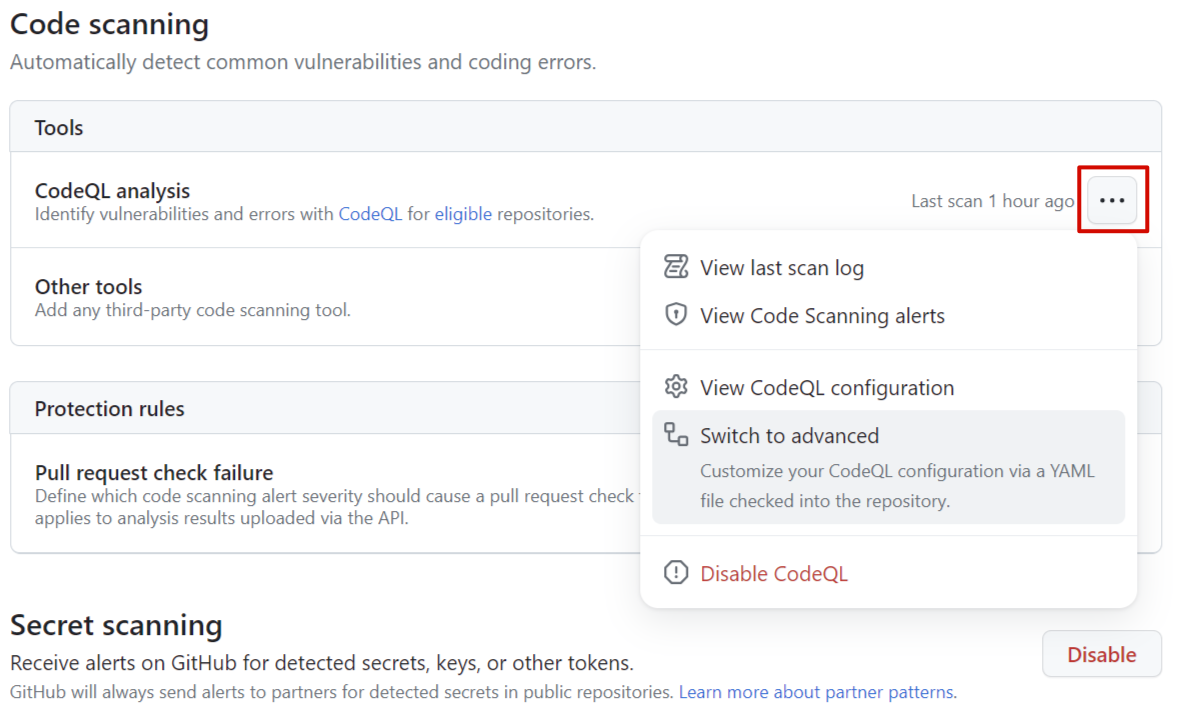
If you already enabled CodeQL with the default settings, select the menu labeled "...", then select Switch to advanced. Select Disable CodeQL when prompted. Don’t worry, we will re-enable it after we’ve completed the advanced setup process.
After selecting or switching to advanced, you'll be taken to a GitHub Actions workflow file named codeql.yml. You can find it in your Web Goat repository’s /.github/workflows directory. This is the file we use to run and configure CodeQL.
The following lines towards the end of the codeql.yml file run the autobuilder:
    # Autobuild attempts to build any compiled languages (C/C++, C#, Go, Java, or Swift).
    # If this step fails, then you should remove it and run the build manually (see below)
    - name: Autobuild
      uses: github/codeql-action/autobuild@v2
Remove them and replace them with the following:
    - if: matrix.language == 'java'
      name: Set up java 17
      uses: actions/setup-java@v3
      with:
          distribution: 'temurin'
          java-version: 17
          architecture: x64

    - if: matrix.language == 'java'
      name: Build with Maven
      run: mvn -B package --file pom.xml
This simple workflow will try to build the application with Maven, instead of the autobuilder.
Commit this to the main branch.
2. Check the results.
Now open the repository's Actions tab. There should be two CodeQL analysis jobs running, one for Java and one for JavaScript. Both should work this time.
When the job is complete, go to the repository's Security tab and select the Code scanning section of the menu on the left.
On the top of this page, there should be a status notification to let you know that CodeQL is working.
We should now see more results than we did before because we will have Java vulnerabilities in addition to the JavaScript vulnerabilities displayed last time. You can see more information by selecting the Tool status. If the Java job failed, be sure to double check your indentation and spacing.
Up Next: Fine-tune testing scope with CodeQL
Now that we have an advanced setup to work with, let’s tackle the other two most common advanced CodeQL configuration tasks: changing the queries we run and excluding directories.