Practical guide to CI with Jenkins and GitHub
January 16, 2018 // 3 min read

Implementing Continuous Integration (CI) can reduce errors in code, shorten development cycles, and help your team ship software faster. In this article, we'll show you how to get started with CI, and take a closer look at integrating GitHub with Jenkins.
Why CI matters
Companies need to release software faster than ever, and CI has become an important part of keeping up. With CI in place, teams can build, test, and update their code within minutes, increasing quality and reducing time to production.
With so much change in the tech field, teams can use many different kinds and combinations of tools. That's why our focus is on making life easier for as many developers as possible, giving teams the freedom to integrate with the best tools out there. Today, GitHub integrates with hundreds of third party tools, including some of the most popular and well-documented integrations around—all available from Marketplace and the Works with GitHub directory.
What is Jenkins?
Jenkins is one of the most popular CI tools on the market with over 150K installations worldwide. It also has first class support for GitHub and GitHub Enterprise built into the default installation. And, with concepts like Pipeline-as-Code, the entire build process can be checked into GitHub and versioned like the rest of your team's code for audit readiness and traceability.
How does it work with GitHub?
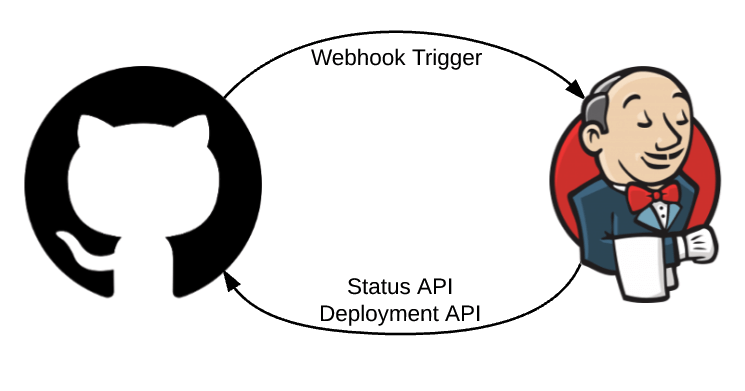
Jenkins scans your entire GitHub organization and creates Pipeline jobs for each repository containing a Jenkinsfile—a text file that defines the process of building, testing, and deploying your project using Jenkins. Immediately after code is checked in or a new pull request is created, Jenkins will execute the Pipeline job and return the status to GitHub indicating whether it failed or succeeded. This process allows you to run a build and subsequent automated tests at every check in so only the best code gets merged. Catching bugs early and automatically reduces the number of problems introduced into production, so your team can build better, more efficient software.
Deployments that occur in Jenkins can also be recorded back into GitHub to audit the entire lifecycle.
Integrating Jenkins with GitHub
With Blue Ocean, the new UI for Jenkins, it's easier than ever to integrate CI into your GitHub workflow. Follow these steps to get started:
- Make sure you have the latest Blue Ocean Plugin along with the GitHub Plugin for Blue Ocean which should be installed automatically. Learn more about installing Blue Ocean.
- Create a new pipeline and select GitHub as your repository.
- Enter a Personal Access Token from GitHub in order to give Jenkins access to scan your private repositories. If this was done previously, Jenkins may skip this step.
- Follow the instructions to select an organization and Auto-discover Jenkinsfiles in order to add Pipelines for all the repositories in an organization when they contain a Jenkinsfile.

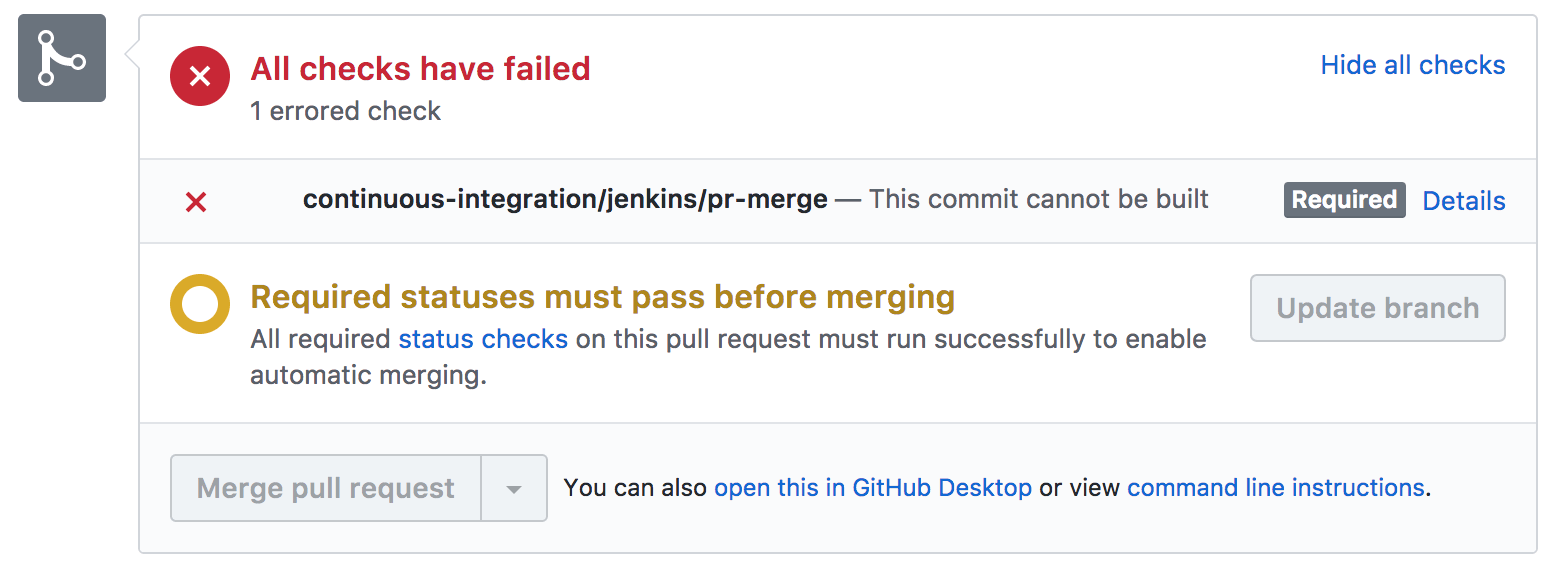
Status checks
After a Pipeline is executed, Jenkins will automatically return the build status to GitHub. You can view this status right from a pull request and require it to pass before merging the pull request. Requiring a status check is a special branch protection. Checks ensure that only code that's successfully built and tested can be merged.
Deployment API
Pull requests are not just conversations about code. They also act as an audit trail that tracks why a decision was made, how the change was developed, and the process followed to release the change. Record deployments in a pull request to trace the process from development to production with the deployment API.
Follow these steps to post back to the deployment API from a Jenkins Pipeline:
- Install the HTTP Request Plugin and the Pipeline Utility Steps on Jenkins. The HTTP Request Plugin will allow a Pipeline to easily make a REST API call to the deployment API, while the Pipeline Utility Steps help easily parse the JSON response.
- Create a deployment using the deployment API before the actual deployment.
- Execute the deployment in Jenkins according to your internal process.
- Record the status of the deployment using the deployment API.
- View the details of the deployment right from the corresponding pull request.
Check out an example Pipeline that uses the deployment API.
Other integrations and notes
If you use the Classic UI (not Blue Ocean) with Jenkins Pipelines, GitHub Organizations with the GitHub Branch Source Plugin can be created with all of the functionality mentioned above. Learn more from the documentation.
If you don't use Blue Ocean or Jenkins Pipelines, try the GitHub Plugin which can auto-manage webhooks and report back the status of Freestyle Projects.
Traditional version control systems (VCS) required CIs to poll the VCS at specified intervals to check for changes. This added a significant load to the VCS, while only detecting changes at the polling interval. Instead, we recommend using webhooks that trigger CI based on events like commits, ensuring that your team is notified as soon as a change happens and removing the load from GitHub.
Learn more
If you'd like to learn more about CI, head over to our resources library. To explore the hundreds of other best-in-breed integrations built for GitHub, check out our Marketplace and the Works with GitHub directory.
If you have a specific question or would like to learn about our solutions for businesses, please fill out the form below, and someone from our team will get in touch.
Tags